How to Choose an Electric Water Bath Canner
The best electric water bath canner matches your jar load, outlet, counter space, and control preferences. Check capacity, temperature settings, cord placement, and whether you can use the appliance near a water source.
On this page (8 sections)
- How do electric water bath canners work?
- What capacity should an electric water bath canner have?
- Which controls matter on an electric water bath canner?
- What kitchen power requirements should you check?
- Should you choose electric or stovetop?
- What other features make a canner easier to use?
- How should you set up and care for an electric water bath canner?
- Which electric water bath canner should you choose?
The best electric water bath canner matches your batch size, controls, power needs, and available counter space. That fit matters more than the largest capacity or the most settings.
An electric model can simplify temperature management for routine batches. It still needs a safe outlet, a stable surface, and room to lift hot jars without reaching across steam.
A stovetop canner may offer more flexibility if you already have a suitable pot and cooktop. It can also serve other kitchen jobs, which matters in a small kitchen.
Start with the foods you preserve most often. Jams, pickles, and tomatoes for water bath processing have different needs from low acid foods that require pressure processing.
Think about how you like to work. Some people prefer a self contained appliance with a dial or buttons.
Others prefer a familiar burner and a pot they already know.
Check counter space before you order. Measure the footprint, the height with the lid on, and the space needed to remove jars safely.
Storage matters as much as use. A large canner that must live on the counter can crowd daily cooking.
A bulky pot that is hard to lift when empty will be harder when full.
Compare the appliance with a traditional best water bath canner before you decide. The comparison helps you weigh dedicated controls against a pot you can move and store.
Also consider whether a pressure canner pot better fits your foods. Water bath and pressure processing are not interchangeable.
Check electrical access early, not after delivery. The unit should sit near a suitable outlet without a cord crossing a sink or wet area.
Let jar size guide capacity more than total quarts. Quart jars need clear height and spacing, while pint jars can pack differently on the rack.
A smaller batch may suit a compact model better than a large one. Filling a large canner for a few jars can waste time, energy, and water.
A large seasonal batch may suit a larger vessel. Crowding jars can cause uneven coverage and handling problems during loading and removal.
Make sure controls are readable while the canner is hot. Steam, glare, and a full lid can make small markings hard to use.
Cleaning should fit your routine. Smooth interiors, removable parts, and a lid that can be washed as directed reduce friction after each batch.
Check that your work surface supports the full weight. Water, jars, lids, and the vessel add up quickly, especially with quart jars.
Consider your lift and reach too. A canner that is easy to load at counter height may still be awkward to drain.
Seasonal produce can change your plans. A harvest year may justify more capacity than a quiet year with a few batches.
Ask how often you will can, what jars you own, and where the unit will live. Those answers narrow the choice faster than a long feature list.
Keep tested recipes at hand from the start. The canner should support the recipe, not replace its method, timing, or safety guidance.
The right choice balances heat source, capacity, controls, and practical handling. It should fit your kitchen as it is, not as you hope it will be.
How do electric water bath canners work?
An electric water bath canner heats water around sealed jars and keeps the jars submerged during processing. The appliance's controls manage heating, while the lid helps hold heat inside the vessel.
The exact controls differ between electric water bath canners. Some use a dial, while others use buttons or digital settings.
Look for controls that are easy to read while the canner is full and hot.
A countertop unit can reduce the need to lift a heavy pot onto a burner. It still requires careful handling because the water, jars, lid, and steam become hot during use.
Use tested recipes and current safety guidance for every food. The National Center for Home Food Preservation explains general water bath canning principles and processing guidance.
What capacity should an electric water bath canner have?
Choose capacity by the number and size of jars you normally process at one time. A canner that holds your regular batch without crowding is more useful than the largest model that barely fits your kitchen.
Quart jars need more vertical and horizontal room than pint jars. Check the rack arrangement and the appliance's usable interior dimensions instead of judging capacity from the outside alone.
If you mostly process small batches, a compact electric water bath canner may be easier to fill, drain, clean, and store. If you preserve large seasonal batches, look for enough room to keep jars spaced and fully covered as required by the recipe.
Our guide to a water bath canner for quart jars can help if quart jars are your main priority. For jar selection, compare best canning jars 32 oz and best canning jars 16 oz.
Which controls matter on an electric water bath canner?
The most useful controls are clear temperature settings, an easy to read display or dial, and a simple way to monitor heating. Choose controls that fit your recipes and your comfort with manual timing.
A temperature control can help you manage the heating stage. It does not replace the processing time and method in a tested recipe.
You still need to start timing at the correct point for that recipe. A hotter setting does not mean a shorter or safer process.
A dial can suit simple routines and quick adjustments. It can also be hard to set precisely if the markings are small.
Buttons can suit people who prefer preset steps. They can also limit control if the options do not match your recipes.
A digital display can be clear at a glance. It can also be difficult to read through steam or at an angle.
Check where the controls sit on the appliance. Controls near rising steam may be hard to use or may collect moisture over time.
Check whether the display faces you from your normal working position. A control that looks clear in photos may be awkward in a real kitchen.
A separate power switch can make daily use feel safer. It gives you a clear way to turn the unit off without unplugging it.
A clear indicator light can help you see when heating is active. It should be visible without leaning over the lid.
Simple controls often suit beginners better than complex menus. Fewer steps can mean fewer mistakes during a busy batch.
Experienced canners may want finer adjustment. They may also prefer to manage timing themselves with a separate timer.
Elevation can affect processing in some recipes. Controls do not remove the need to follow current guidance for your area.
A control that holds heat steady can reduce guesswork. It cannot correct a wrong jar size, wrong headspace, or wrong method.
Labels should be plain and readable. Words such as heat, simmer, and timer mean different things on different appliances.
Check how the controls respond to a power interruption. You should know whether the unit restarts, stays off, or needs to be reset.
Check whether the timer is built in or separate. A built in timer can help, but it does not change the recipe timing rules.
Check how you will hear or see alerts. A soft beep is easy to miss during a busy batch.
Manual timing still matters even with smart controls. The recipe should stay in charge.
Write down your normal routine before you compare models. That routine will show whether you need simple, precise, or preset controls.
Choose the control style you will actually use under time pressure. The best control is the one you can read, set, and trust.
What kitchen power requirements should you check?
Check the appliance voltage, wattage, plug, cord placement, and outlet location before buying. The canner should connect directly to a suitable outlet and sit where the cord will not cross a wet work area.
Avoid placing the appliance where steam can reach cabinets, outlets, or other electronics. Leave room around the unit as required by its instructions.
Keep the surface level before adding water. A sloped surface can change water coverage and make the unit harder to manage.
Do not assume that a countertop canner is suitable for an extension cord or power strip. Follow the appliance instructions and your home electrical safety guidance.
A dedicated outlet near the work area makes setup easier. It also reduces the temptation to stretch a cord across the counter.
Check cord length against your planned spot. Too short can pull the unit toward the edge, while too long can droop near water.
Keep the plug away from steam through cord placement. Heat and moisture are a poor mix for electrical connections.
The plug shape can affect fit in some outlets. A bulky plug may block nearby sockets or sit at an awkward angle.
Wattage helps you understand power demand. It does not tell you how fast the canner heats or how well it holds temperature.
Voltage must match your home supply. The wrong match can damage the appliance and create a safety risk.
Circuit load matters in older kitchens. Other large appliances on the same circuit can cause trips during long processing times.
Check whether the instructions name an approved outlet type. That detail is more useful than a general claim about convenience.
Leave clearance above the unit for steam and lid removal. Cabinets above can collect moisture and can be damaged over time.
Leave side clearance for handles, tools, and jar lifting. Tight walls can make a bulky canner hard to use safely.
Avoid placing the unit beside a sink. Splashes, wet hands, and a hot vessel should not share the same small space.
Avoid placing the unit on a surface that moves. A cutting board, towel, or unstable mat can shift when the lid is lifted.
Heat safe surfaces protect counters and nearby items. Check the instructions for approved surfaces before the first batch.
Keep flammable items away from the heating area. Towels, paper, and packaging should not sit near steam vents.
Plan where hot jars will go before you start. A towel lined tray at arm height can prevent awkward carrying.
Check ventilation in the room. Steam from a full canner can fog windows and settle on nearby surfaces.
Inspect the cord before each batch. Cuts, frays, or a loose plug are signs to stop and seek qualified help.
Store the cord safely after use. A loose cord can be pinched, wet, or damaged in a crowded drawer.
Power needs should be part of the buying decision, not an afterthought. A canner that fits your outlet and layout will be easier to use safely.
Should you choose electric or stovetop?
Choose an electric water bath canner for dedicated countertop heating and built-in controls. Choose a stovetop canner when you want a pot that can also serve other kitchen purposes or when your cooktop already handles the required base safely.
Stovetop models vary in cooktop compatibility. Some work on induction and glass ranges, while others are specifically not suitable for those surfaces.
KITCHEN CROP Harvest Stainless Steel 20 Qt Canning
The KITCHEN CROP Harvest suits you if you want a stovetop option with 20 quarts of capacity. Its stainless steel construction has a flat clad bottom for even heating, and the double-sided rack supports water bath or steam canning.
The pot has room for up to 8 pint jars or 7 quart jars. A tempered glass lid includes a built-in temperature indicator, and the canner is backed by a 5-year warranty.
This is not an electric countertop appliance, so you need a compatible cooktop and enough space to move a full pot safely. It may fit buyers who want one canner for more than one stovetop type.
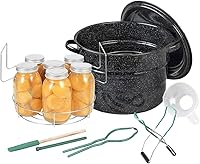
Granite Ware Canning Pot with Rack
The Granite Ware set suits you if you want 21.5 quarts of capacity plus a canning toolset. Its rack holds 7 one-quart jars, 9 pint jars, or 12 half-pint jars, and the set includes a bubble remover, jar lifter, magnetic lid lifter, jar wrench, and jar funnel.
The enamelware pot is not suitable for glass cooktops or induction stovetops. That limitation matters more than its larger capacity if your kitchen uses either of those surfaces.
Choose this set when the included tools would replace items you still need to buy. Choose another option if you need induction or glass compatibility.
Prep•N•Cook by McSunley 21.5Qt Induction Stainless Steel
The McSunley suits you if you want a large 21.5-quart stainless steel canner that works with induction and glass top ranges. Its flat encapsulated base is designed for uniform heat distribution, and the rack holds 7 one-quart, 9 one-pint, or 12 half-pint jars.
The tempered glass lid allows you to view the cooking process. Silicone-wrapped wire handles are attached to the pot, and the canner is dishwasher safe.
Like the KITCHEN CROP, this is a stovetop canner rather than an electric water bath canner. It may be a better fit than an electric unit if you want a large pot that can also serve as a stockpot for soups, stews, lobster, or corn on the cob.
What other features make a canner easier to use?
A rack that keeps jars off the bottom helps with loading and water circulation. Check how the rack is lifted, where it rests, and whether its arrangement matches your jar sizes.
A glass lid can let you watch the heating process without removing the lid. A temperature indicator can make timing easier, but you still need to follow recipe elevation and processing instructions.
For replacement parts, start with our guide to choosing a water bath canner lid. If you need jars and accessories, see our guide to the best mason jars for canning.
A sturdy rack should feel steady before water is added. Wobbling handles or bent supports can shift jars during loading.
Side rests can make placement easier. They can also be hard to grip if the rack is hot and wet.
Handles should be easy to hold with a lifter or tongs. They should not force your hands close to steam.
Jar spacing should match your usual jars. A rack for quart jars may not suit pint jars without gaps or crowding.
A rack that holds mixed sizes can suit varied batches. It can also make full loads less stable if sizes differ too much.
Water circulation matters for even processing. Jars should not touch the bottom or sit so close that water cannot move.
A glass lid reduces lid lifting during heating. That can help hold heat and reduce steam exposure.
A glass lid can also fog, so viewing may be limited. You should not rely on sight alone to judge processing.
A temperature indicator in the lid can support timing. It should be read as a guide, not as a replacement for tested steps.
Elevation zones can help at different altitudes. You still need current guidance for your location and recipe.
Handles should stay cool enough to grip safely. Silicone wraps or insulated grips can help during lifting.
A large stockpot shape can serve other kitchen jobs. That can make the purchase feel more useful between canning seasons.
A lid that fits well helps hold heat. A loose or warped lid can let steam escape and change heating.
Smooth rims are easier to clean after splashes. Deep crevices can trap food and make care harder.
Removable parts should be easy to wash and dry. Storage space should be checked before you buy a wide or tall model.
Tools should fit the rack and lid design. A lifter that cannot reach the rack handles will slow removal.
Weight when empty is only part of the story. Weight when full of water and jars decides whether moving the canner is practical.
Check where the canner will be filled and drained. A sink nearby can help, but carrying a full pot remains a risk.
Choose features that support your jar sizes and work habits. Small details decide whether a canner feels helpful or fussy.
How should you set up and care for an electric water bath canner?
Set the canner on a stable, heat safe surface near the required outlet. Keep the cord away from water, leave space for steam, and place jar tools where you can reach them without leaning across the hot appliance.
Before each batch, inspect the lid, rack, controls, cord, and vessel. Use the water level and jar arrangement required by your recipe, then follow appliance cleaning instructions after the canner has cooled.
Do not move a full canner unless the instructions specifically explain how to do so safely. Hot water and glass jars can shift when the vessel is lifted.
For the basic process, read how to use a water bath canner before your first batch.
Which electric water bath canner should you choose?
Choose an electric water bath canner if you want a dedicated countertop appliance with built in heating and controls. Confirm its capacity, power requirements, and approved use before buying.
Choose the KITCHEN CROP if you need 20 quart capacity with induction, glass, and gas cooktop compatibility. Its stainless steel pot has a flat clad bottom and a double sided rack for water bath or steam canning.
The KITCHEN CROP rack holds up to 8 pint jars or 7 quart jars. A tempered glass lid includes a built in temperature indicator, and the pot is backed by a 5 year warranty.
Choose Granite Ware if you want 21.5 quarts and a five piece toolset, but only on an approved cooktop. The set is not suitable for glass cooktops or induction stovetops.
The Granite Ware rack holds 7 one quart jars, 9 pint jars, or 12 half pint jars. The toolset includes a bubble remover, jar lifter, magnetic lid lifter, jar wrench, and jar funnel.
Choose McSunley if you want 21.5 quart stainless steel construction with induction and glass compatibility. Its flat encapsulated base is designed for uniform heat distribution.
The McSunley rack holds 7 one quart, 9 one pint, or 12 half pint jars. A tempered glass lid allows viewing, and silicone wrapped wire handles aid grip.
The McSunley pot can also serve as a large stockpot. That can suit soups, stews, lobster, or corn on the cob between canning batches.
None of these three options is an electric countertop appliance. They are stovetop canners, so cooktop compatibility is a key part of the choice.
Electric models suit people who want dedicated controls and a self contained heating system. Stovetop models suit people who have a suitable range and want more flexibility.
Capacity should match your regular batch, not your largest possible batch. Crowding jars or filling a large pot for a small load both cause problems.
Counter space and storage should be measured before you buy. A large pot that is hard to store will be used less often.
Power needs matter only for electric units, but outlet access still matters for planning. A stovetop canner needs safe burner space instead.
Jar size should drive the final pick. Quart jars need different room and handling than pint or half pint jars.
Your recipes should stay in charge of method and timing. A canner should help you follow a tested process, not change it.
Choose KITCHEN CROP for 20 quarts and versatile cooktop use. Choose Granite Ware for capacity plus tools on an approved cooktop.
Choose McSunley for 21.5 quarts with induction and glass compatibility. Choose electric only if a dedicated countertop appliance fits your kitchen and routine.
The right choice is the one that fits your jars, counter, outlet, and recipes without creating a handling problem.
Frequently asked questions
Is an electric water bath canner better than a stovetop canner?
An electric water bath canner can suit you if you want a self-contained appliance with dedicated controls and no need to match a pot to your cooktop. A stovetop canner may be more flexible if you already have a suitable range, need a large stockpot, or want to avoid adding another countertop appliance.
How many jars should an electric water bath canner hold?
Choose capacity based on your usual batch, not the largest batch you might make once a year. A canner that holds 7 quart jars or 8 to 9 pint jars can suit many home batches, while smaller electric water bath canners may be easier to store and fill.
Can you use an electric water bath canner on a glass cooktop?
An electric water bath canner is normally designed to heat through its own electrical element, but check the appliance instructions before using it anywhere near a glass cooktop. A stovetop alternative must specifically suit the surface, since some canners are not safe for glass or induction ranges.
What should you check before buying an electric water bath canner?
Check the jar capacity, control method, temperature range, power requirements, cord length, lid design, drainage, cleaning instructions, and storage footprint. Also confirm that the appliance's approved process matches the foods and recipes you plan to preserve.